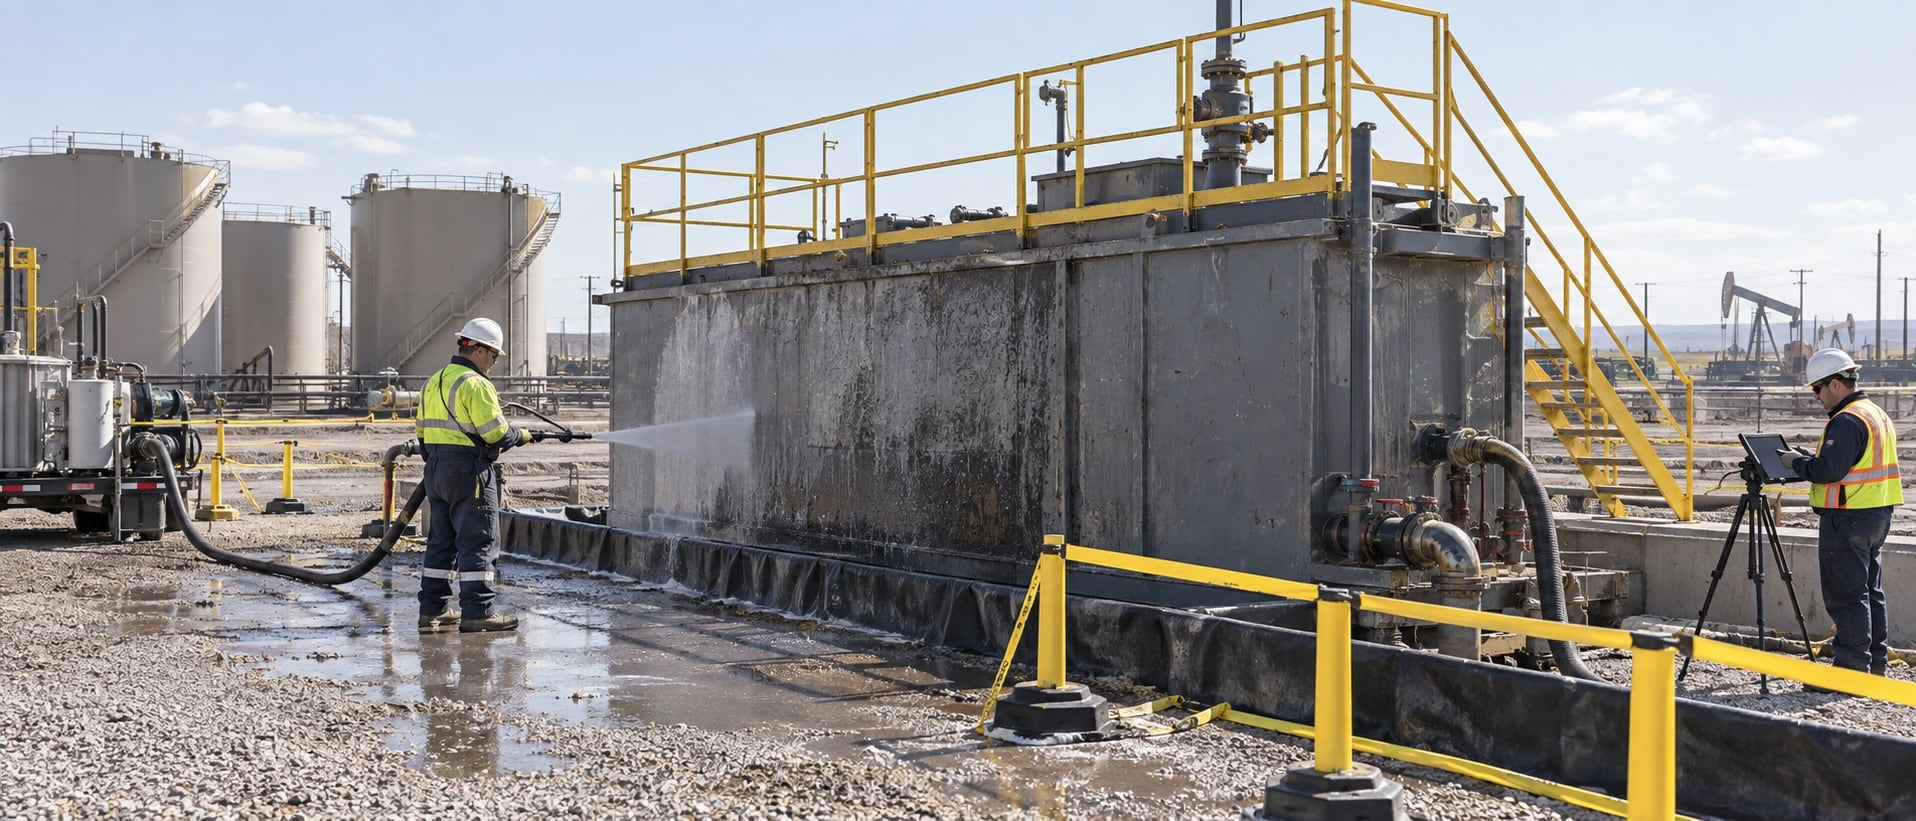
Mud tank cleaning works best when the team plans the work before opening a hatch or starting washdown. Remove recoverable fluid and settled material from outside the tank where practical, isolate connected equipment and flow paths, manage residue and wash water, inspect the tank, and return it to service through the site-approved process.
A mud tank is part of a working fluid system, not an isolated container. Its condition affects usable volume, pump reliability, fluid quality, and the solids that return to circulation. Cleaning should begin with the tank history, its contents, and the equipment connected to it.
Tank condition also reflects the wider solids control equipment system. Upstream separation, flow routing, agitation, and transfer practices determine how much material reaches a compartment and how difficult the eventual cleanout becomes.
Key takeaways
- Plan the cleaning process around the actual tank, fluid, residue, connected equipment, and waste destination.
- Remove fluid and loose solids externally before considering internal work.
- Isolate energy, pressure, flow, and mechanical movement before cleaning or inspection.
- Use washdown as a controlled cleaning method, not as a substitute for containment or inspection.
- Use repeat cleanout findings to improve tank maintenance and reduce future buildup.
Why Mud Tanks Need a Planned Cleanout
Settled solids can collect at low points, around internal piping, beneath agitators, near suction connections, and in compartments with weak circulation. As material accumulates, the tank can lose usable volume, create inconsistent fluid properties, or return solids to pumps during a change in flow. A clean-looking surface does not confirm a clean tank. Dense residue may remain below the fluid line, behind baffles, or under equipment supports.
Recognize conditions that increase buildup
Heavy solids loading, interrupted agitation, poor turnover, long storage periods, weak flow paths, and inaccessible low points can all increase cleanout work. Review where residue appeared during previous tank inspections and whether the same compartment repeatedly needs extra attention. This distinguishes a one-time upset from a recurring operating issue.
Consider the upstream solids path as well. A shale shaker removes the larger solids early in the process, but changes in shale volume, screen performance, drilling rate, or fluid properties can still alter the load delivered to the tank. When a cleanout becomes unexpectedly difficult, compare the current tank condition with the separation performance and flow pattern that preceded it.
Establish the Cleaning Plan Before Work Starts
Establishing a plan means identifying the tank, its contents, likely residue, connected pumps and lines, access points, tools, wash-water source, containment method, and destination for recovered material. Determine what can be completed from outside the tank and what site procedures apply if internal access becomes necessary.
Review current fluid information, equipment condition, and the work area before cleaning begins. A plan that only says “wash the tank” does not address pressure, stored energy, unexpected inflow, residue, waste handling, or return-to-service checks.
Pre-cleaning checklist
- Confirm the tank identification, compartment, current contents, and expected solids.
- Identify pumps, agitators, transfer lines, drains, valves, and electrical equipment.
- Define recovery for usable fluid, loose solids, sludge, and wash water.
- Review access, lighting, communication, housekeeping, and site-specific controls.
- Assign responsibility for isolation, cleaning, inspection, waste handling, and recommissioning.
- Document the conditions that led to the cleanout.
Remove Material Without Entry Where Practical
Start by recovering usable drilling mud and removing loose material through available pumps, drains, vacuum equipment, or other external tools. This reduces the volume managed during tank cleaning and can limit internal work. The best method depends on residue, tank geometry, access, and the approved equipment available at the location.
External removal does not eliminate inspection. Watch the recovery stream, low points, and suction areas so material is not simply moved to another part of the system. Confirm that drains, hoses, and receiving equipment can handle the expected material before starting.
External removal checklist
- Recover fluid that can be retained or transferred under the site plan.
- Use controlled suction, pumping, or vacuum removal for loose solids and sludge.
- Keep recovered fluid, solids, and wash water separated when required.
- Check low points and corners after removal rather than assuming the tank is empty.
- Stop and reassess if restrictions or unexpected residue indicate a different condition.
External work also improves the quality of the eventual tank inspection. Removing fluid and loose solids first makes it easier to identify hard-packed material, damaged liners, blocked drains, and residue behind fixed equipment. It can also reduce the amount of cleaning that must take place near confined or difficult-to-reach areas.
Isolate Energy and Connected Flow Paths
Cleaning work should not begin until the team has addressed the sources of movement and flow associated with the tank. Depending on the equipment, that can include electrical power, mechanical rotation, trapped pressure, gravity, transfer lines, pump suction and discharge paths, and automatic controls. Follow the applicable site isolation and verification process for the specific equipment.
Removing visible fluid does not make a tank ready for work. Connected lines can introduce fluid or pressure. An agitator or pump can create movement. A valve in the wrong position can defeat an otherwise careful cleaning plan. Treat isolation as a verified condition, not an assumption.
Check the system, not only the tank
Walk the related system before cleaning. Trace the lines that enter and leave the compartment, identify shared pumps and controls, and check whether adjacent tanks can affect the work area. This prevents a clean tank from receiving new material during the job and supports a controlled return to service.
Manage Washdown, Residue, and Spray
Pressure washing can help dislodge residue from walls, baffles, low points, and accessible equipment. Select it for the material and surface condition, then control the spray so it does not damage a liner, force solids into an unsuitable location, or send wash water outside containment.
Choose spray nozzles, hoses, pumps, and cleaning equipment that match the work plan and tank condition. Direct spray toward collection points when practical. Inspect the wash-water route before work starts, especially around drains, platforms, adjacent equipment, and transfer connections.
Use pressure washing deliberately
- Inspect hoses, fittings, nozzles, pumps, and guards before use.
- Confirm the spray pattern can reach the target area without damaging liners or fittings.
- Control splash, mist, runoff, and residue within the approved work area.
- Clean corners, baffles, suction points, drains, and areas below fixed equipment methodically.
- Collect wash water and solids according to the site waste-handling plan.
Position each nozzle for the area it must clean rather than relying on a broad spray from one access point. A nozzle that does not reach a low point can leave dense residue in place. A nozzle aimed directly at a vulnerable liner, seal, or fitting can create a maintenance issue. Confirm nozzle reach, flow, and control before relying on pressure washing as the cleaning method.
Do not confuse washdown with completion
Pressure washing is one tool in the cleaning procedure. It does not confirm that drains are open, low points are clear, equipment is isolated, or the tank is ready for storage or active service. Verify the final condition through inspection and the applicable closeout process.
The washdown plan should also account for the fluid system. Water, oil-based residue, additives, and fine solids may require different containment and disposal decisions. Do not select a cleaner or add water simply because it appears to speed the work; confirm compatibility with the material, the tank liners, the recovery plan, and applicable compliance requirements.
Inspect the Tank Before Return to Service
Tank inspection should occur after bulk material is removed and surfaces are visible. Check the bottom, walls, baffles, weld areas, liners, drains, suction points, valves, agitation equipment, guards, and access hardware. The inspection identifies problems residue may have hidden and confirms whether the cleaning work reached the intended areas.
Look for blocked outlets, damaged liners, loose hardware, abnormal wear, and residue that can break free during startup. Record findings clearly enough that the next crew understands what was repaired, what needs follow-up, and whether a temporary operating restriction applies.
Tank inspection checklist
- Inspect surfaces, baffles, corners, and low points for remaining solids or damage.
- Check drains, valves, suction connections, and transfer points for blockage or leakage risk.
- Inspect tank liners, fasteners, guards, access platforms, and agitation components.
- Confirm that tools, waste, temporary hoses, and loose items are removed.
- Record defects, recurring buildup locations, and maintenance actions before recommissioning.
Verify the cleaning quality before closeout
A cleaning crew should verify the actual condition of the tank, not simply the time spent on the job. Compare the finished surfaces and low points with the planned cleaning scope. Confirm that the cleaning method reached the compartments, corners, drains, and equipment supports identified at the start. If material remains, decide whether it requires further removal, a maintenance action, or a documented operating limitation.
A clean tank should have a known, inspected condition before it returns to service. This check prevents a partial tank cleaning job from being mistaken for a completed cleanout. It also makes the closeout record more useful when the same tank is inspected or cleaned again.
Return the Tank to Service Through a Controlled Closeout
Recommissioning is separate from cleaning. Restore equipment and normal flow only through the approved sequence for the site. Verify valve positions, remove temporary controls when authorized, check for leaks, and monitor early operation for restricted flow or material released from a settled area.
A closeout record improves tank maintenance. Include the condition before cleaning, recovery and cleaning methods, waste disposition, inspection findings, repairs, and areas where solids accumulated. This record can show whether the same tank needs a process change rather than another identical cleanout.
Confirm the return-to-service condition
Before returning the tank to the active system, confirm that it is configured for the intended fluid, related equipment is ready, and the work area is clear. Site procedures and equipment instructions take precedence for specific operating limits, isolation steps, and inspection requirements.
Bring the tank back online in a way that lets the team observe flow and equipment behaviour. Watch for leaks, unusual pump response, restricted suction, debris at a screen or valve, and residue released from a previously settled area. A controlled startup can identify a problem while it is still easier to correct.
Prevent Repeat Cleanout Work Through Better Operation
The most efficient tank cleaning process begins during normal operation. Maintain appropriate agitation and turnover, monitor low points, inspect areas that collect solids, and correct recurring flow problems. Upstream separation also matters: the way a mud cleaner operating principles and upstream separation guide handles solids can change the load that reaches the tank.
Tank geometry, compartment flow, agitation placement, suction location, and access all affect cleaning efficiency. Use each cleanout alongside the solids control tank layout considerations for cleanout access to identify dead zones or hard-to-reach areas that warrant an operating or layout review.
Use repeat findings as operating data
If the same material settles in the same place, identify the cause. The issue may involve incoming solids, reduced agitation, a restricted line, or a layout that does not support complete evacuation. Correcting the cause helps preserve tank life and reduces the labour and downtime associated with repeated cleaning.
A useful record compares each tank cleaning event with the preceding operation: fluid type, shale loading, transfer route, time in storage, cleaning equipment used, nozzle arrangement, residue location, and inspection findings. This turns cleanout observations into practical information for the next campaign. It also helps the team decide whether a change in operating practice, tank maintenance, or layout can improve cleaning efficiency.
Frequently Asked Questions
Can a mud tank be cleaned without personnel entry?
In some situations, pumping, vacuum removal, remote tools, and controlled washdown can reduce internal work. The appropriate method depends on the tank, residue, access, equipment, and site-approved process.
What should be isolated before tank cleaning?
Address the energy, movement, pressure, and flow sources associated with the specific tank and connected equipment. This can include agitators, pumps, controls, transfer lines, valves, and stored pressure.
Is pressure washing the predominant method used for tank cleaning?
Pressure washing may be useful for some residue and surfaces, but it is only one method. Recovery, pumping, vacuum removal, controlled spray, inspection, and waste handling should match the tank condition and work plan.
How do teams prevent solids from collecting in a mud tank?
Monitor agitation, turnover, incoming solids, flow paths, low points, and compartment performance. Repeat buildup should trigger a review of the operating condition or tank layout rather than more frequent cleaning alone.
What should a closeout record include?
Document the tank condition, material removed, cleaning method, inspection results, maintenance actions, waste disposition, and recommissioning checks. This supports better planning for the next cleaning event.